Area Triggers and Actions
By setting up your Items and groups in the following way, you will be able to use one rule for much of the automation in your home. A second rule is needed if you’d like to have the lights adjust to Mode (Time of Day) and outside lux levels. The concept is that each area within a home has triggers and the combined state of those triggers can represent whether there is activity/presence within that area. By putting the triggers into a group, actions can take place when the state of that group changes.
Sensor state change → Area trigger group state change → Rule triggered → Action(s) determined from metadata → Action(s) called
Putting the logic into groups takes some getting used to, but by working with groups you will not need to build the area/room specific logic into your rules. I have been able to build out group logic to fit all of the areas inside and outside of our home for use with lighting (including colors and brightness level based on outside lux), music/sounds, and notifications (e.g., when the doors are unlocked for too long). I originally wrote this about two years ago using the rules DSL and stored the mode based light levels in a Hashmap. Moving to the new rule engine and scripted automation, I was able to incorporate Item metadata.
Setup groups and Items
Create regular groups named
gArea_TriggerandgArea_Action. These groups will hold the respective trigger and action groups. ThegArea_Triggergroup will be used in the rule trigger.Group gArea_Trigger "Area Triggers" Group gArea_Action “Area Actions”
Section out your home into areas where automation takes place.
Create an area trigger group for one of the areas using a name ending in “_Trigger”. This group will hold all of the Items that can be used to identify if the area is active or not. All of the Items in a trigger group must be of the same type (Switch or Contact). Reread that last sentence… it’s important! Most of my devices use Z-Wave and have both switch and contact Channels to choose from. Area trigger groups need to have a type of Switch or Contact, an aggregation function, and they need to be members of the
gArea_Triggergroup. When a trigger group is ON or OPEN, the area is active.Group:Switch:OR(ON,OFF) gDS_FamilyRoom_Trigger "Family Room [%s]" (gArea_Trigger)
Add the triggering Items to the area trigger group that you have created. If you do not have devices to use for the trigger, you can create dummy Items that can be used to manually trigger the rule.
Create another group with the same name as the area trigger group, but this time ending in “_Action”. The naming is important, since the rule will be using the area action group associated with the area trigger group based on the name. This group will hold all of the Items in the area that you want to take action on when activity in the area starts and stops. Add this group to the
gArea_Actiongroup.Group gDS_FamilyRoom_Action "Family Room" (gArea_Action)
Add the action Items into the area action group that you have created.
Repeat steps 3-6 for each area in your home.
At times, you’ll need to invert the state of an Item or group of Items.
To do this, create another group inside of the trigger group using Group:Switch:NAND(ON,OFF) and place the Item(s) you need to reverse the state for inside this group.
For example, when door locks are unlocked, their state is OFF.
By adding a lock to a NAND area trigger group, the group will be ON when the door is unlocked (OFF).
If you add more than one lock to the group, the group will stay ON until all locks are ON (locked).
There are several interesting solutions that can be created using group logic.
Experiment with the possibilities and look through the Example Lighting Scenarios.
As I find time, I will document more complex scenarios.
If you have questions or difficulty, just ask!
Here are some truth tables that are helpful for understanding the states of groups using logic based aggregation functions:
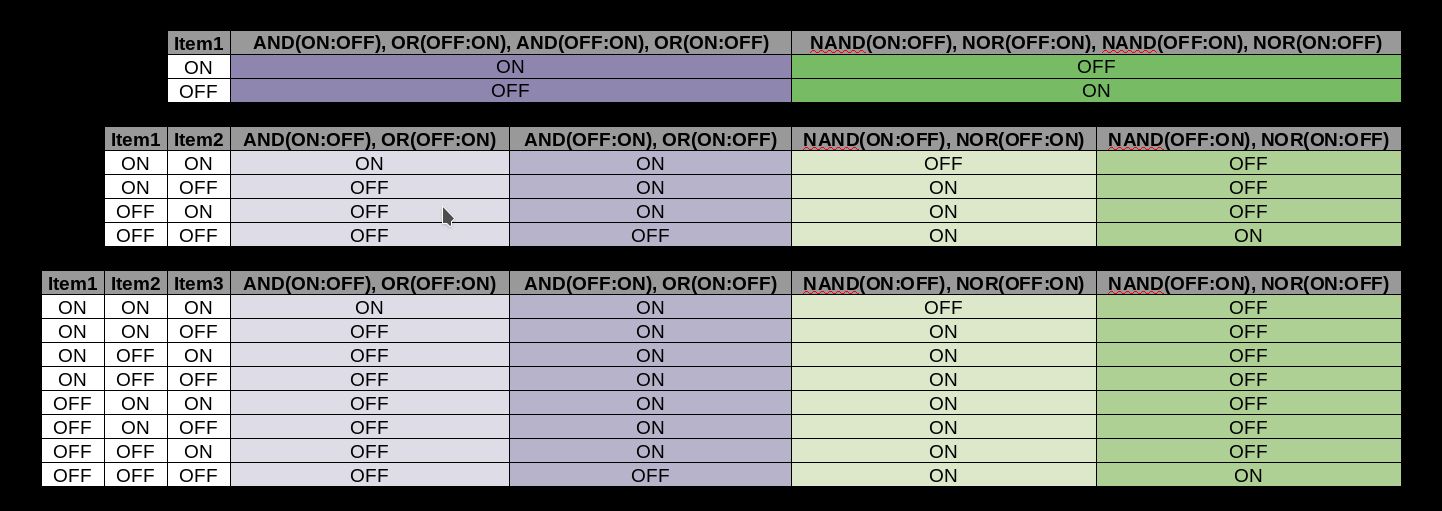
Truth table of Group aggregation functions
Example Group and Item structure:
Group    gArea_Trigger
Group:Switch:OR(ON,OFF)    gDS_FamilyRoom_Trigger    (gArea_Trigger)
Group:Switch:OR(ON,OFF)    gUS_LivingRoom_Trigger    (gArea_Trigger)
Group:Switch:OR(ON,OFF)    gUS_EntranceGarage_Trigger (gArea_Trigger)
    Group:Switch:NAND(ON,OFF)    gUS_EntranceGarage_Bathroom_Trigger    (gUS_EntranceGarage_Trigger)
    Group:Switch:NAND(ON,OFF)    gUS_EntranceGarage_Lock_Trigger (gUS_EntranceGarage_Trigger)

gArea_Trigger
    |_ gFamilyRoom_Trigger
        |_ DS_FamilyRoom_Motion
        |_ DS_FamilyRoom_Slider_Contact
    |_ gLivingRoom_Trigger
        |_ US_LivingRooom_Motion
        |_ US_LivingRoom_Slider_Contact
    |_ gEntranceGarage_Trigger
        |_ US_EntranceGarage_Motion
        |_ US_Laundry_Contact
        |_ gUS_EntranceGarage_Bathroom_Trigger
            |_ US_GuestBathroom_Contact (when this contact is OFF (open) the group is ON
        |_ gUS_EntranceGarage_Lock_Trigger
            |_ Lock_GarageAttached_Inner (when this lock is OFF (unlocked) the group is ON
gArea_Action
    |_ gFamilyRoom_Action
        |_ gDS_FamilyRoom_Bulbs
    |_ gLivingRoom_Action
        |_ US_LivingRoom_Dimmer
    |_ gEntranceGarage_Action
        |_ US_EntranceGarage_Dimmer
Setup the Modules and Script
Follow these instructions to setup Jython.
Follow these instructions for general steps to install a Community package.
The Area Triggers and Actions package and script will work for everyone out of the box for lighting, but a personal package is also provided with examples that are meant to be customized for sound, notifications, and any other action that you would like to include.
To use a custom action, you’ll need to remove the .example from the example files and then add your custom functions.
The imports are setup in the community package so that all functions will be made available from your custom area_actions module, just be sure to include your functions in the __all__ variable to make them accessible.
This Community package includes:
The (
/automation/jsr223/community/area_triggers_and_actions/area_triggers.py) scriptThe
community.area_triggers_and_actionspackageThe
community.area_triggers_and_actions.__init__module contains functions that will be used by the script to start actions and their timers.The
community.area_triggers_and_actions.area_actionsmodule contains the action functions used by the script.The
light_actionfunction should work for everyone with and without metadata for controlling dimmers, colored lights, and switches.
The (
/automation/jsr223/personal/area_triggers_and_actions/update_metadata.py.example) script example is for adding/updating your Item metadata.The
personal.area_triggers_and_actionspackageThe empty
personal.area_triggers_and_actions.__init__to create the package.The
personal.area_triggers_and_actions.area_actions.py.examplefile provides examples of action functions that can be used by the script.The
speaker_actionfunction is an example of how I’ve implemented this and is specific to my setup.The
notification_actionfunction is an example of my implementation and is specific to my setup.
Setup Mode and Lux/Solar Radiation Levels (optional)
In my rules, I use the concept of Mode, which is similar to Time of Day.
I have time based modes for Morning, Day, Evening, Night and Late, but I also have modes for Party and Security, which don’t automatically turn off based on time.
In this way, lights won’t dim when the party runs until dawn or a burglar is breaking in.
Modes allow you to:
Have different lighting levels for various times of the day or for modes of the house
Use different sets of lights (nightlights instead of overheads in
Nightmode, colorful LEDs forPartymode, etc.)Use manual lighting triggers to turn the lights on to the preset levels for your mode
In addition to Mode, you can optionally include an Item to provide the outside light level.
This allows you to have the lights adjust to levels that make sense for how bright it is outside.
I don’t have lux sensors inside our home, but this is something I’d like to add in the future.
Setup the ‘Mode (Time of Day) <Python/Community/Mode (Time of Day)>` Community package. As it’s documentation instructs, adjust the times in
configuration.mode_dictto suit your needs.Create an Item that will provide lux or solar radiation data, and add its name to
configuration.area_trigger_dict["lux_item_name"]. The simplest is to setup the Astro binding and use theradiation#diffuseChannel linked to an Item to provide a calculated lux level based on the sun’s position in the sky. The direct or total Channel would also work, but if you chart them, the diffuse Channel has a slightly more gradual transition. In my setup, I have a rule to validate and correct the lux values from several sources, and I use the Astro diffuse Channel reduced by the current cloudiness as a fallback.Add metadata to your Items to turn ON/OFF switches and adjust dimmer values based on the
Modeand current lux values. It is possible to add simple Metadata to Items through.itemsfiles, but this is very limited and does not support the hierarchical key structures used here. Eventually, there will be a UI for adding/editing Item metadata, but until then, you will need to use a simple script for updating your Item metadata. An example is provided in/automation/jsr223/personal/area_triggers_and_actions/update_metadata.py.example. Just remove the.examplefrom the file name, write out the metadata to suite your setup, and save the file. To add/change the metadata, just make changes and save the file again. The metadata will be rewritten each time the file is saved. If you are done making changes, it is best to comment out everything in the file, so that the metadata is not rewritten every time you restart openHAB. The examples below are expanded out to multiple lines so that it is easier to see the structure, but they can be written in one line too.from core.metadata import set_metadata # Lighting dimmer or switch set_metadata("US_Kitchen_Table_Dimmer", "area_triggers_and_actions", { "mode": { "Morning": {"low_lux_trigger": 20, "brightness": 98}, "Day": {"low_lux_trigger": 90, "brightness": 98}, "Evening": {"low_lux_trigger": 90, "brightness": 98}, "Night": {"low_lux_trigger": 90, "brightness": 1}, "Late": {"low_lux_trigger": 5, "brightness": 0}, "Party": {"low_lux_trigger": 25, "brightness": 98} } }, overwrite=True) # Lighting colors set_metadata("DS_FamilyRoom_TV_LED_Color", "area_triggers_and_actions", { "mode": { "Morning": {"low_lux_trigger": 5, "hue": 100, "saturation": 100, "brightness": 10}, "Day": {"low_lux_trigger": 55, "hue": 255, "saturation": 100, "brightness": 10}, "Evening": {"low_lux_trigger": 90, "hue": 255, "saturation": 100, "brightness": 10}, "Night": {"low_lux_trigger": 90, "hue": 240, "saturation": 100, "brightness": 10}, "Late": {"low_lux_trigger": 5, "hue": 0, "saturation": 100, "brightness": 10}, "Party": {"low_lux_trigger": 25, "hue": 0, "saturation": 100, "brightness": 10} } }, overwrite=True)
Customize the metadata to suit your lighting needs in each mode, for each of your areas.
When the lux_item_name Item value drops above/below the low_lux_trigger value for lights in active areas, the lights will turn ON/OFF or adjust their levels.
When the mode changes, the low_lux_trigger for each active area will be compared to the current lux value and the lights will turn ON/OFF/dim accordingly.
In these metadata examples, you may have noticed that the maximum brightness value was set to 98.
The light_action function ignores lights if their brightness is set to a value > 98, so they can be manually turned up in a room to remove them from automations.
Also, note that only modes metadata is included in the example.
If actions metadata is not provided, the default action configured in configuration.area_triggers_and_actions_dict["default_action_function"] is used.
The default action is originally configuraed for the light_action.
Metadata is not required for every Item.
There is a default setting in configuration.area_triggers_and_actions_dict["default_levels"] that will be used for any Item that does not have modes in its metadata.
The script is configured to reload the configuration module when it is saved, so after modifying these values, you will need to reload/resave the area_triggers script or restart openHAB for the changes to take effect.
Example Lighting Scenarios
A light switch with a door contact sensor:
The lights in a closet usually don’t need to be adjusted based on the outside lux or mode. When no metadata is set for an Item, the script will use the default values, which turn the lights on full for all modes. The default values are set in the
configuration.py.Group:Switch:OR(ON,OFF) gUS_Pantry_Trigger "Pantry (upstairs) [%s]" <presence> (gArea_Trigger) Group gUS_Pantry_Action "Pantry (upstairs)" <presence> (gArea_Action) Switch US_Pantry_Contact "Pantry (upstairs) [MAP(contact.map):%s]" <contact> (gUS_Pantry_Trigger) {channel="zwave:device:55555:node5:alarm_entry"} Switch US_Kitchen_Pantry_Switch "Kitchen Upstairs: Pantry [%s]" <switch> (gUS_Pantry_Action) {channel="zwave:device:55555:node55:switch_binary"}A light switch with a motion sensor and contact sensor
This example will describe the use of a contact sensor to stop a light from turning off if the door is closed. The light will turn ON when there is motion or the door closes. The light will turn OFF when there is no motion *and* the door is open.
Group:Switch:OR(ON,OFF) gUS_AnyaBathroom_Trigger "Anya's Bathroom [%s]" <presence> (gArea_Trigger)
Group:Switch:NAND(ON,OFF) gUS_AnyaBathroom_Door_Trigger "Anya's Bathroom Door [%s]" <presence> (gUS_AnyaBathroom_Trigger)
Group gUS_AnyaBathroom_Action "Anya's Bathroom" <presence> (gArea_Action)

Switch US_AnyaBathroom_Contact "Anya's Bathroom [MAP(contact.map):%s]" <contact> (gUS_AnyaBathroom_Door_Trigger) {channel="zwave:device:55555:node68:alarm_entry"}
Switch US_AnyaBathroom_Motion "Anya's Bathroom [MAP(motion.map):%s]" <motion> (gUS_AnyaBathroom_Trigger) {channel="zwave:device:55555:node47:sensor_binary"}
Dimmer US_AnyaBathroom_Dimmer "Anya's Bathroom [%d %%]" <slider> (gUS_AnyaBathroom_Action) {channel="zwave:device:55555:node23:switch_dimmer"}
Metadata…
set_metadata("US_AnyaBathroom_Dimmer", "area_triggers_and_actions", {"modes": {"Morning": {"low_lux_trigger":99999, "brightness":98}, "Day": {"low_lux_trigger":99999, "brightness":55}, "Evening": {"low_lux_trigger":99999, "brightness":55}, "Night": {"low_lux_trigger":99999, "brightness":20}, "Late": {"low_lux_trigger":99999, "brightness":7}, "Party": {"low_lux_trigger":99999, "brightness":98}}}, overwrite=True)Since contact sensors have a state of ON when they are open, the
gUS_AnyaBathroom_Door_Triggergroup is used to invert this value (it will be OFF when the door is open).Three dimmers, a smart bulb and a switch with three motion sensors and a contact sensor
There is a light over the kitchen table, at the kitchen sink, a bulb over the stove, and the overhead lights in the kitchen. There are three motion sensors… over the sink, in the main area of the kitchen, and outside the kitchen door. This example includes the contact from example 1, so the kitchen lights will not turn off if the pantry door is open. The pantry light is independent from the other lights in the kitchen, but activity in the pantry area keeps the kitchen active. The light over the sink is also independent from the other lights (it has its own trigger/action groups)
Group:Switch:OR(ON,OFF) gUS_Kitchen_Trigger "Kitchen (upstairs) [%s]" <presence> (gArea_Trigger)
Group:Switch:OR(ON,OFF) gUS_Kitchen_Sink_Trigger "Kitchen Sink (upstairs) [%s]" <presence> (gArea_Trigger,gUS_Kitchen_Trigger)
Group:Switch:OR(ON,OFF) gUS_Pantry_Trigger "Pantry (upstairs) [%s]" <presence> (gArea_Trigger,gUS_Kitchen_Trigger)

Group gUS_Kitchen_Action "Kitchen (upstairs)" <presence> (gArea_Action)
Group gUS_Kitchen_Sink_Action "Kitchen Sink (upstairs)" <presence> (gArea_Action)

Dimmer US_Kitchen_Dimmer "Kitchen Upstairs [%d %%]" <slider> (gUS_Kitchen_Action) {channel="zwave:device:55555:node19:switch_dimmer"}
Dimmer US_Kitchen_Sink_Dimmer "Kitchen Upstairs: Sink [%d %%]" <slider> (gUS_Kitchen_Sink_Action) {channel="zwave:device:55555:node30:switch_dimmer"}
Dimmer US_Kitchen_Table_Dimmer "Kitchen Upstairs: Table [%d %%]" <slider> (gUS_Kitchen_Action) {channel="zwave:device:55555:node31:switch_dimmer"}
Switch US_Kitchen_Pantry_Switch "Kitchen Upstairs: Pantry [%s]" <switch> (gUS_Pantry_Action) {channel="zwave:device:55555:node13:switch_binary"}
Dimmer US_Kitchen_Stove_Bulb "Kitchen Upstairs: Stove [%d %%]" <slider> (gUS_Kitchen_Action) {channel="zigbee:device:16befd6d894:7ce524000013f7ef:7CE524000013F7EF_1_dimmer"}

Switch US_Pantry_Contact "Pantry (upstairs) [MAP(contact.map):%s]" <contact> (gUS_Pantry_Trigger) {channel="zwave:device:55555:node67:alarm_entry"}
Switch US_Kitchen_Motion "Kitchen (upstairs) [MAP(motion.map):%s]" <motion> (gUS_Kitchen_Trigger) {channel="zwave:device:55555:node148:sensor_binary"}
Switch US_Kitchen_Ceiling_Motion "Kitchen Ceiling (upstairs) [MAP(motion.map):%s]" <motion> (gUS_Kitchen_Sink_Trigger) {channel="zwave:device:55555:node118:sensor_binary"}
Switch US_HallwayEntrance_Motion "Hallway (upstairs) - Entrance [MAP(motion.map):%s]" <motion> (gUS_Kitchen_Trigger) {channel="zwave:device:55555:node51:sensor_binary"}
Here is the metadata…
set_metadata("US_Kitchen_Stove_Bulb", "area_triggers_and_actions", {"modes": {"Morning": {"low_lux_trigger":20, "brightness":98}, "Day": {"low_lux_trigger":90, "brightness":98}, "Evening": {"low_lux_trigger":90, "brightness":98}, "Night": {"low_lux_trigger":90, "brightness":55}, "Late": {"low_lux_trigger":90, "brightness":10}, "Party": {"low_lux_trigger":90, "brightness":98}}}, overwrite=True)
set_metadata("US_Kitchen_Table_Dimmer", "area_triggers_and_actions", {"modes": {"Morning": {"low_lux_trigger":20, "brightness":1}, "Day": {"low_lux_trigger":90, "brightness":98}, "Evening": {"low_lux_trigger":90, "brightness":98}, "Night": {"low_lux_trigger":90, "brightness":1}, "Late": {"low_lux_trigger":90, "brightness":0}, "Party": {"low_lux_trigger":90, "brightness":98}}}, overwrite=True)
set_metadata("US_Kitchen_Dimmer", "area_triggers_and_actions", {"modes": {"Morning": {"low_lux_trigger":20, "brightness":1}, "Day": {"low_lux_trigger":90, "brightness":98}, "Evening": {"low_lux_trigger":90, "brightness":98}, "Night": {"low_lux_trigger":90, "brightness":1}, "Late": {"low_lux_trigger":90, "brightness":0}, "Party": {"low_lux_trigger":90, "brightness":98}}}, overwrite=True)
set_metadata("US_Kitchen_Sink_Dimmer", "area_triggers_and_actions", {"modes": {"Morning": {"low_lux_trigger":20, "brightness":98}, "Day": {"low_lux_trigger":90, "brightness":98}, "Evening": {"low_lux_trigger":90, "brightness":98}, "Night": {"low_lux_trigger":90, "brightness":98}, "Late": {"low_lux_trigger":90, "brightness":98}, "Party": {"low_lux_trigger":90, "brightness":98}}}, overwrite=True)
As you build out more areas, you can essentially “light the way” through your house.
For example, in my setup, the areas one step out from the kitchen (Dining Room and Garage Entrance) are also in the gUS_Kitchen_Trigger group.
Also, the gUS_Kitchen_Trigger group is a member of gUS_EntranceFront_Trigger.
It can get a little complicated with a lot of these areas setup, but for most people, it is a lot easier to piece it all together than writing code.
Metadata Structure
All fields are case sensitive.
If a
Modeor any of the lighting keys are left out, the default values fromconfiguration.area_triggers_and_actions_dict["default_levels"]will be used. For switches, a value of 0 is OFF and everything else is ON.For timers, the
recurringkey is optional. If it is not included, the timer will not repeat. If it is included, it must have a value ofTrueorFalse.Custom actions can make use of custom metadata structures, as illustrated with
notification_action.Metadata is to be set on the members of an area action group, which can be Items or groups. It can also be set directly on an area trigger group (see Using Functions with Area Trigger Groups).
This example lists every metadata option, but seldom are they all used.
"area_triggers_and_actions": {
    "modes": {
        "Morning": {"low_lux_trigger": 5,  "hue": 100, "saturation": 100, "brightness": 10},
        "Day":     {"low_lux_trigger": 55, "hue": 255, "saturation": 100, "brightness": 10},
        "Evening": {"low_lux_trigger": 90, "hue": 255, "saturation": 100, "brightness": 10},
        "Night":   {"low_lux_trigger": 90, "hue": 240, "saturation": 100, "brightness": 10},
        "Late":    {"low_lux_trigger": 5,  "hue": 0,   "saturation": 100, "brightness": 10},
        "Party":   {"low_lux_trigger": 5,  "hue": 0,   "saturation": 100, "brightness": 10}
    },
    "actions": {
        "light_action": {
            "ON": {
                "delay": 60,
                "recurring": False
            },
            "OFF": {
                "delay": 60,
                "recurring", True
            }
        },
        "notification_action": {
            "limited": False,
            "ON": {
                "delay": 300,
                "message": "The outside doors are not all locked",
                "recurring": True
            },
            "OFF": {
                "delay": 5,
                "recurring": False
            }
        },
        "my_custom_action_function": {
            "limited": True
            "ON": {
                "custom_key_1": "custom value 1",
                "custom_key_2": "custom value 2",
                "delay": 5,
                "recurring": False
            }
        }
    }
}
Using Timers
Timers can be configured in the metadata to delay an action after an area has been triggered (ON) or after it is no longer active (OFF).
Timers can be configured to be recurring.
Timers are canceled when the area trigger changes state.
In the lighting examples below, the modes metadata has been left out and the default lighting levels will be used.
# OFF - after the area trigger group has become inactive (OFF), the action for this dimmer is delayed for 3 minutes
set_metadata("US_GarageAttached_Dimmer", "area_triggers_and_actions",
    {
        "actions": {
            "light_action": {
                "OFF": {
                    "delay": 180
                }
            }
        }
    }, overwrite=True)

# OFF - after the area trigger group has become inactive (OFF), the action for this speaker is delayed for 30s
set_metadata("US_MasterBathroom_Speaker_Player", "area_triggers_and_actions",
    {
        "actions": {
            "speaker_action": {
                "OFF": {
                    "delay": 30
                }
            }
        }
    }, overwrite=True)

# ON - after the area trigger group has become active (ON), the action for this dimmer is delays 5 minutes (I don't use this, but the functionality is there)
set_metadata("US_GarageAttached_Dimmer", "area_triggers_and_actions",
    {
        "actions": {
            "light_action": {
                "OFF": {
                    "delay": 300
                }
            }
        }
    }, overwrite=True)
Using Functions with Area Trigger Groups
Actions can also be used on area trigger groups.
In this case, an associated area action group is not required.
In order to limit the action to only one state of the area trigger group, use the limited key in the metadata, or the function will be executed for both ON and OFF.
# ON - after the area trigger group has become active (ON), the notification repeats every 1 hour, limited to the ON state
set_metadata("gOutside_Door_Trigger", "area_triggers_and_actions",
    {
        "actions": {
            "notification_action": {
                "limited": True,
                "ON": {
                    "delay": 3600,
                    "message": "The outside doors are not all locked",
                    "recurring": True
                }
            }
        }
    }, overwrite=True)

# ON - after the area trigger group has become active (ON), the group and all of its members will receive an OFF command in 5 minutes (this could be used for motion sensors that never update to OFF)
set_metadata("gGarage_Entrance_Motion_Trigger", "area_triggers_and_actions",
    {
        "actions": {
            "limited": True,
            "toggle_action": {
                "ON": {
                    "delay": 300
                }
            }
        }
    }, overwrite=True)
Visualization
To see the state of the areas, a simple sitemap entry…
Group item=gArea_Trigger
… will give you a view into which are active or inactive. You can drill down into the groups to see which Items are triggering the activity. Depending on your mode and lux settings, an active area does not mean that the lights are turned ON.
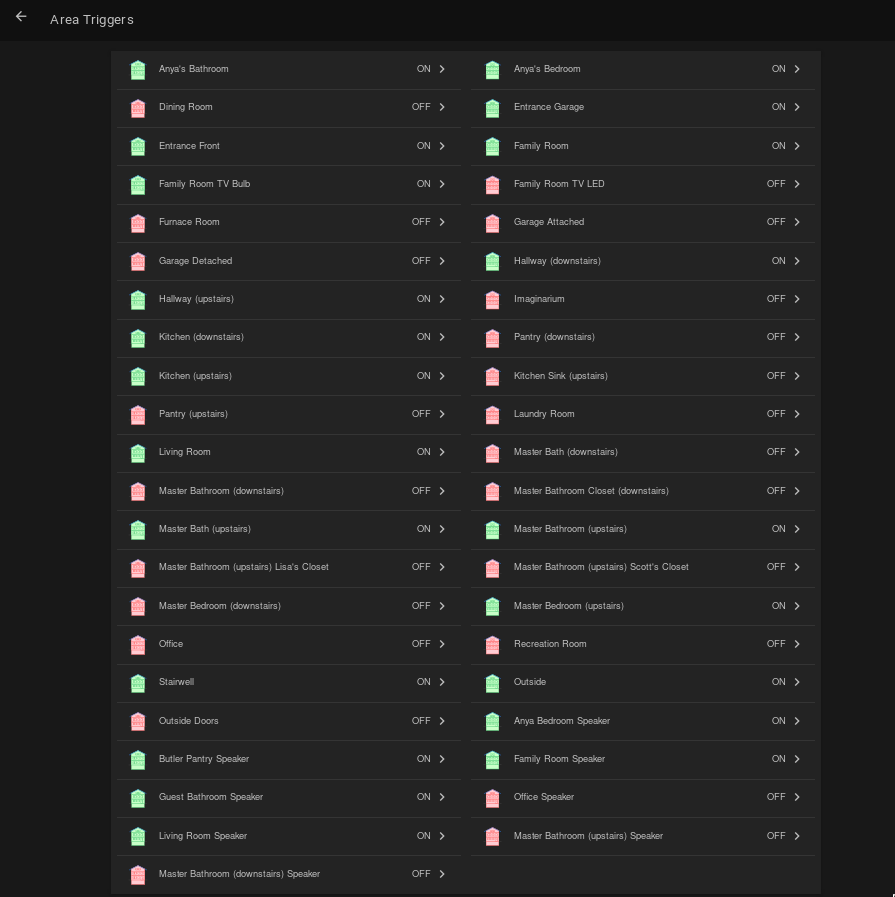
Area triggers viewed in Basic UI
This is much better illustrated with an SVG floorplan. Active areas are green and inactive are grey. Note, the sun was bright when I took this screenshot, so most lights are OFF in the active areas of the house.
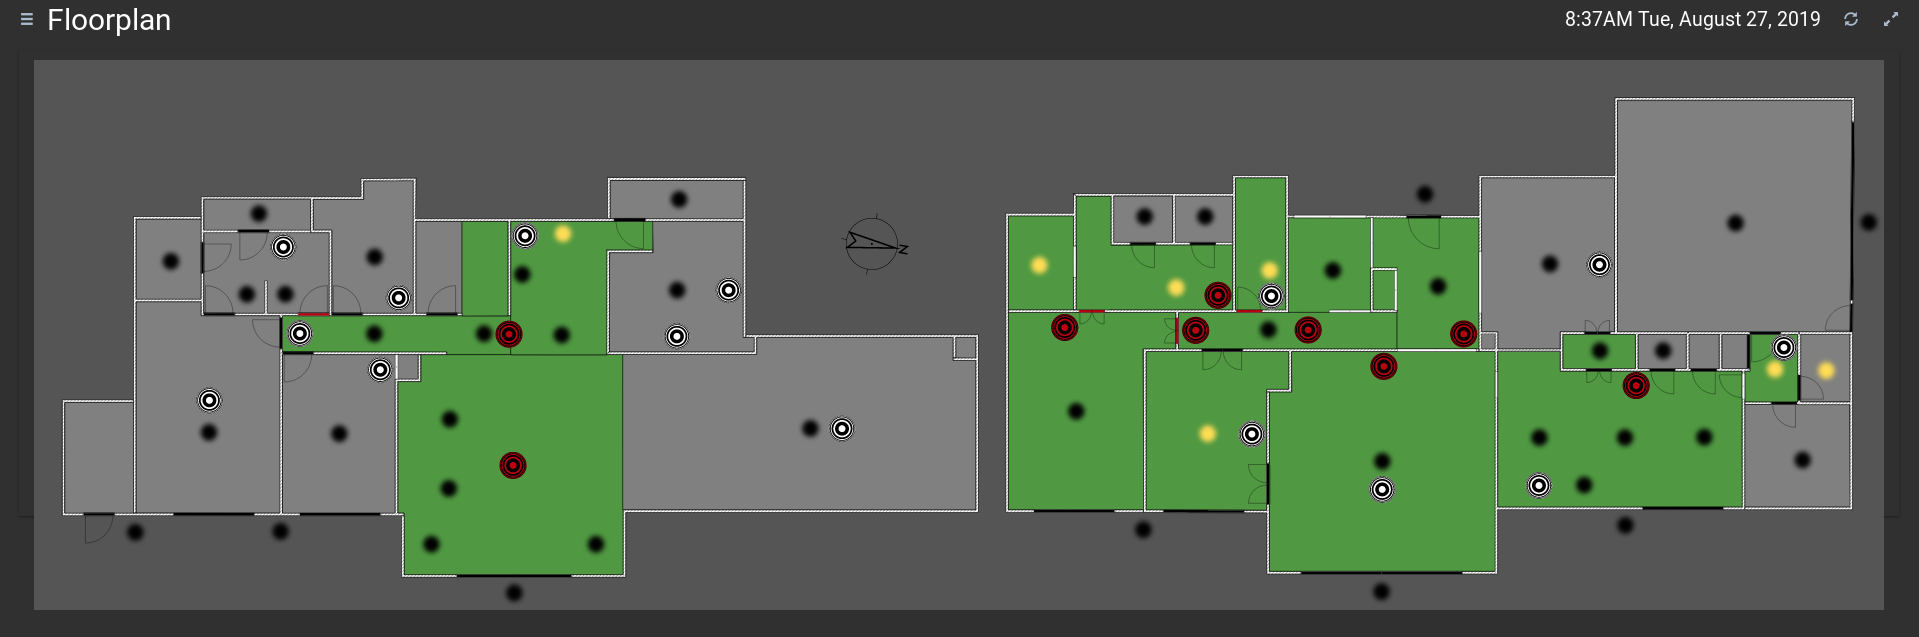
Area triggers viewed in HabPanel floorplan widget